Irish Stew and Soda Bread
It’s cold in Chicago. Time to get my stew on. I really enjoyed the beef stew and bread combo from last year, but this time i wanted an easier to make bread. I went with the a soda bread (quick to make) but one with whole wheat (more hearty).
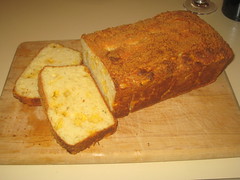
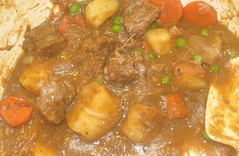
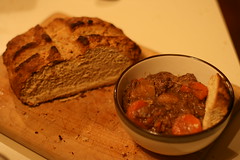
The bread turned out awesome – the consistancy was more like cornbread, went great with stew or just butter and jam. The stew was incredibly hearty (almost too meaty, very little liquid), had good flavor, but the potatoes and carrots were a bit mushy (next time might throw them in only for the last half of cooking).
Slow Cooker vs Dutch Oven
Since I don’t have a slow cooker as the recipe calls for, I had to use my dutch oven (which works better than a slow cooker according to many chefs). I found slight variations on how to convert between the two, so I did my own recipe modification. The details of what I did are included in the recipe below, [my notes bold and bracketed]. First, here’s a summary of what I found on the internets:
- Converting from Slow cooking to an oven would be about 175 degrees for low setting and high is 250 to 275. (src).
- Low on Slow Cooker is 200 degrees, high is 300. Plus slow cookers need less liquid and less herbs (src).
- Low setting in a slow cooker takes about a quarter as long in a Dutch oven in a 325-degree oven. High setting takes about half as long. (src).
Guinness Beef Stew
(orig) Serves 6 to 8. Published February 1, 2007.
Make sure to buy large chunks of stew meat. Trim meat of excess fat, as necessary, and cut into 11/2-inch pieces. Be gentle when stirring in the flour in step 3-the fork-tender beef will fall apart if stirred too aggressively.
Ingredients
| 4 | pounds boneless beef chuck stew meat [3 pounds could work] |
| Table salt and ground black pepper | |
| 2 | tablespoons vegetable oil |
| 2 | onions , chopped |
| 4 | cups low-sodium chicken broth |
| 1 1/2 | cups Guinness Draught (not Extra Stout) |
| 1 | tablespoon light brown sugar |
| 1 | teaspoon dried thyme |
| 1 | ounce bittersweet chocolate, chopped (not semisweet, not unsweetened) |
| 2 | bay leaves |
| 5 | carrots , peeled and cut into 1-inch chunks |
| 1 | pound parsnips , peeled and cut into 1-inch chunks |
| 1 1/2 | pounds baby red potatoes , scrubbed |
| 1/4 | cup all-purpose flour |
| 2 | tablespoons minced fresh parsley leaves |
Instructions
- Pat beef dry with paper towels and sprinkle with salt and pepper. Heat 2 teaspoons oil in large skillet over medium-high heat until just smoking. Cook half of beef until browned on all sides, about 8 minutes. Transfer to slow cooker insert and repeat with additional 2 teaspoons oil and remaining beef. [I used dutch oven instead of skillet and transferred to a plate]
- Add remaining 2 teaspoons oil, onions, and 1/4 teaspoon salt to skillet and cook until onions are lightly browned, about 5 minutes. Add broth, 1 1/4 cups stout, sugar, thyme, chocolate, and bay leaves and bring to boil, using wooden spoon to scrape up browned bits. Transfer to slow cooker insert. [I used dutch oven instead of skillet, adding beef to dutch oven as last step]
- Add carrots, parsnips, and potatoes to slow cooker insert. Cover and cook on low until meat is tender, 9 to 10 hours (or cook on high for 6 to 7 hours). Set slow cooker to high. Whisk flour and remaining 1/4 cup beer until smooth, then stir mixture into slow cooker. Cook, covered, until sauce thickens, about 15 minutes. Stir in parsley, season with salt and pepper, and discard bay leaf. Serve. [I used dutch oven instead of slow cooker, cooked 6 hours in oven at 275 degrees, 250 would be better]
- Make Ahead: You can prepare the recipe through step 2 the night before the ingredients go into the slow cooker. Refrigerate the browned beef and the onion mixture in separate containers. In the morning, transfer the beef and the onion mixture to the slow cooker and proceed with step 3.
Irish Brown Soda Bread
(orig) Yields 1 loaf. Published March 1, 1997.
Unlike the Classic Irish Soda Bread Dough, which is dry, this dough is extremely sticky.
Ingredients
| 1 3/4 | cups bleached all-purpose flour , plus more for work surface |
| 1/2 | cup cake flour |
| 1 1/4 | cups stone-ground whole wheat flour |
| 1/2 | cup toasted wheat germ |
| 3 | tablespoons brown sugar |
| 1 1/2 | teaspoons baking soda |
| 1 1/2 | teaspoons cream of tartar |
| 1 1/2 | teaspoons table salt |
| 2 | tablespoons unsalted butter , softened |
| 1 | tablespoon unsalted butter melted |
| 1 1/2 | cups buttermilk |
Instructions
- Adjust oven rack to upper-middle position and heat oven to 400 degrees. Whisk flours, toasted wheat germ, sugar, baking soda, cream of tartar, and salt in large bowl. Work softened butter into dry ingredients with fork or fingertips until texture resembles coarse crumbs. [I did 1.5c AP flour, 1.5c Whole Wheat]
- Add buttermilk and stir with a fork just until dough begins to come together. Turn out onto flour-coated work surface; knead until dough just becomes cohesive and bumpy, 12 to 14 turns. (Do not knead until dough is smooth, or bread will be tough.)
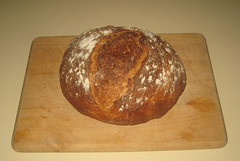
- Pat dough into a round about 6 inches in diameter and 2 inches high; place on greased or parchment-lined baking sheet or in cast-iron pot, if using. Place the loaf on a cookie sheet and cut a cross shape into the top.
- Bake until golden brown and a skewer inserted into center of loaf comes out clean or internal temperature reaches 190 degrees, 45 to 50 minutes. Remove from oven and brush with melted butter; cool to room temperature, 30 to 40 minutes.
Step-by-Step
Proper Handling for a Proper Irish Bread
 1. Mix the dough with a fork until it just comes together.
 2. Turn the dough out onto a work surface and knead just until loose flour gets incorporated; do not overknead.
 3. Shape the dough into a six-inch round.
 4. Place the loaf on a cookie sheet and cut a cross shape into the top.
 5. For a golden crust that’s thin and crisp, with a bit of a chew, bake in a cast-iron pan.